Powered by Blogger.
Showing posts with label polka dot. Show all posts

Nail Fraud: Disco

Thursday, January 6, 2011

I have another Nail Fraud post, and this will be my last one, because i'm out of decals, but I think I saved the best for last.  I have to say that this is my favorite print from the 3 sets that I got.  The design looks amazing, but I do have one big fat complaint, though.  This set was very different from the others.  The other decal's presentation was very similar to the Incoco appliques, they have a protective film on top, and they apply better, they kind of bend to match the shape of your nail.  But this ones really just look and feel like plane ol' stickers! They do not have a protective film and they are very hard to match the shape and curves of the nail, they feel kind of stiff on the nail. Also, they didn't came inside a sealed package.  On the other appliques, if you are left with wrinkles on them, they often disappear the next day (I think heat helps with this), but not with Disco.  I applied them yesterday and I still have stiff wrinkles towards the free end of my nails (and I don't think they are disappearing any time soon!).  Also, the print seems very fragile, like any little scratch is going to damage it, so I applied a thick coat of a glossy top coat over it.  In the end, the result looks pretty cool, because this design is amazing and colorful, so I am happy with how my nails ended up.  See for yourself. Click on the pics to make them bigger.

Hold decal with thumb and index, apply close to the cuticles. If you mess up, gently remove the decal and reapply

File off excess with nail file (Nail fraud includes this cool nail file!)

Final result! See the gloss? I used OPI's top coat

This is NF's Goldfinger sealed package, with a holding strip and protective film over decals

This is how Disco looks in the package, very different! It lacks all those cool extras that the other designs have!

Read more...

Vamp

Wednesday, October 27, 2010

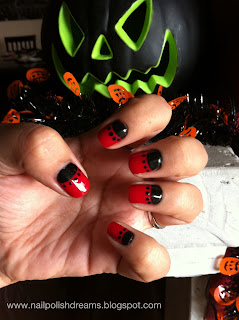
This is what i'm wearing as a "Halloween Mani", it is not as out there as an Orange-Black combination, or as jack-o-lantern patterns, but I think of it as a bloody, vampy, more sophisticated version of a halloween mani.  I started out with blood red nails as a base (Remember I was wearing those Incoco decals?) but you can wear any color that you like, maybe a shimmery orange.  Then, for the crescent moons, I used a nail art pen from Sally Hansen in Black Creme.  Nail pens are very easy to use and you can create so many looks with them, the possibilities are endless! So basically you just draw a half circle in the upper area of your nail and fill it out with the black pen (or you can use some other nail polish brush, it's up to you).  Sorry about the small pics,  I couldn't find my camera so I had to use my phone.


I wore the crescent moon mani for a day, then I decided to add some dots to make it more fun, and this is the end result.


Very simple, but I got so many compliments at work! I hope you guys like it.  I think it looks great by itself, I added dots, but you can add maybe a cool decal, or a rhinestone, or you can invert the colors in one of the nails, use different colors, do a little something different so you can make it your own. 


Read more...

Polka Dot Mani

Sunday, October 24, 2010

I sported this manicure last week and got a few compliments, so I decided to recreate it here...
I got the inspiration a couple of weeks ago, as I was standing in line in H&M. They had some posters in the cashier area and the models had something very similar on their nails.
For this one, I used Sally Hansen Complete Salon Manicure in Grey by Grey as a base, and Lavender Cloud for the dots.  I inverted the colors on the ring finger just for fun.
I used a dotter nail art tool for the dots.  You can buy it online, I think I saw them going for $3.00 in ebay, but if you guys can't get a hold of one, you can use stuff you have around your house like a toothpick, a bobby pin, or the fine point of a orange wood stick cuticle pusher.
It's a very easy way to spice up your nail polish, it looks great and it's inexpensive.
Now, the nail polishes... I ADORE both shades! They are super interesting and unique. What I don't like is the brush on these. It's rounded and thick, and it makes the application very difficult for me. The formula is awesome, almost opaque in one coat, but I always give it at least 2, just for peace of mind (I hate visible nail line).


Anyways, what do you think about it?  What other colors would look good together?

Read more...

  © Blogger templates Newspaper by Ourblogtemplates.com 2008

Back to TOP