ELF Everyday Basics Tutorial
Wednesday, March 23, 2011
This look was one of my first attempts at putting together a look using the new e.l.f. Everyday Basics 32 Palette. Overall, this palette would be a good option if you like neutral looks and don’t already have the original e.l.f. 32 palette. This palette has a lot of the same shades as the original palette, although I do feel that the quality of these shadow has improved a bit. The other difference would be that the row of brighter colors are different and slightly more muted. Anyway, let’s get on with the step-by-step tutorial.
FACE:
1. The first step is to apply foundation primer. I used Hard Candy Sheer Envy Face Primer and a cosmetic wedge to apply a thin layer of primer all over my face.
2. Next, I used the e.l.f. flat top powder brush to apply Maybelline Dream Smooth Mousse Foundation in Porcelain Ivory.
3. Next I primed under my eyes using my e.l.f. Mineral Eyeshadow Primer. This will prevent concealer from caking up and creasing. I just used my finger for this step, as well as the next two steps.
4. I then applied Sally Hansen Fast Fix Concealer in All-Over Brightener to correct discoloration under my eyes.
5. I covered the corrector with a thin layer of Hard Candy Glamoflauge Concealer in Light.
6. I set all my face makeup with Maybelline Shine Free Loose Powder in Light.
7. Next I brightened my skin tone by using the e.l.f. Total Face Brush to apply Physician’s Formula Healthy Wear Bronzer SPF 50 in Fair.
8. Using an angled blush brush, I contoured my cheekbones using N.Y.C. Smooth Skin Bronzing Face Powder in Sunny.
9. I then applied e.l.f. Studio Blush in Candid Coral to the apples of my cheeks and back to my hairline.
10. For a highlight on my cheekbones, I used my Too Faced Absolutely Invisible Candlelight Translucent Powder.
LIPS:
1. To give my lips a slight bit of peachy color, I applied Wet N Wild MegaSlicks Lip Color Pencil in 675A: Peach Fuzz.
2. For shine and moisture, I added some N.Y.C. Kiss Gloss in Pink Lemonade over the lipstick.
EYES:
1. The first step is to prime the eyes for eyeshadow. I used Too Faced Shadow Insurance. I applied a very small amount to my index finger and gently pat the primer from the lashline to the browbone, into the inner corner, and under the lower lashline.
2. Next, I used my e.l.f. Eyeshadow Brush to pat on shade #12 from the e.l.f. Everyday Basics Palette all over the lid and into the bottom part of the crease.
3. Then I used my Essence of Beauty Brush to add shade #7 to the crease. This will serve as a blending shade. I used winshield wiper motions to apply the shadow in the crease of my eye.
4. Using the same shade on the e.l.f. Defining Eye Brush, I lined the bottom lashes from the outside edge to 2/3 of the way in.
5. Using the e.l.f. Defining Eye Brush, I picked up shade #15 and applied it to the outer corner of my eye. This includes the outer 1/2 of the crease, as well as from the outside edge of the crease to the bottom corner of the eye.
 |
| Outer 1/2 of crease. |
 |
| Connect to bottom corner of eye. |
6.I then used shade #1 on my e.l.f. Eyeliner brush to highlight the inner corner of my eyes.
7. Using the Studio Tools Crease Brush, I blended all of the lid and crease shades so that the colors faded gradually and had no harsh lines.
8. The I used the Sonia Kashuk Blending Brush to apply shade #11 under the eyebrow as a highlight. Then I used the same brush to apply shade #1 only under the arch of the brow.
9. Next I used my CoverGirl Perfect Point Plus Eyeliner in Espresso to line the waterline, then the top lashes.
 |
| Lining the waterline. |
 |
| Lining the top lashes by looking down into a mirror. |
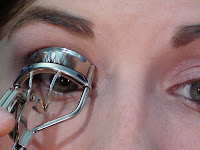
10. Next I took my e.l.f. Mechanical Eyelash Curler and curled my lashes.
11. Finally, I applied a coat of Revlon Grow Luscious Mascara in Black to my top lashes.
And here we have the finished look! I hope you enjoy!


0 comments:
Post a Comment